Asian gluten free rice ramen with garlicky greens kale swiss chard broccoli aramame seaweed

Fallen leaves which scatter the ground, turn the earth into a mosaic of light green, amber and bright orange.  Autumn, my favourite season in Calgary, is upon us.  A season of transition and change: signalling the end to long summer nights, and the beginning of cozy fireplace cuddles and a new hockey season.

With the emergence of gourds in all sizes, shapes, and colours lining the market isles comes enthusiasm of a new season of produce, yet, I still don’t want to say goodbye to fresh summer vegetables.  I know its inevitable…but not quite yet.  

As we returned from a recent trip to visit family abroad, my husband came home and harvested the last of our garden goodness: swiss chard, kale, spring onions, potatoes, carrots, peas, and a few lone tomatoes still clinging to the last bits of summer. Colder days have brought back noodles in our home….a perfect canvas for the greens.


Asian gluten free brown rice ramen garlic greens kale swiss chard broccoli aramame seaweed soy sesame

Asian gluten free rice ramen with garlicky greens kale swiss chard broccoli aramame seaweed

Asian gluten free rice ramen with garlicky greens kale swiss chard broccoli aramame seaweed

Asian gluten free rice ramen with garlicky greens kale swiss chard broccoli aramame seaweed

DSC_9118

This transition into a new season, with its great promise of change and “clean starts” will be an inspiration for new recipes with comforting fall produce, learning new things in photography, getting more involved in my local food community….

Lots to be excited about.

But right now, lets get excited about this dish, because its damn good!

Side Note: I absolutely LOVE Lotus Foods Rice Ramen! They are gluten free and have simple ingredients such as millet and brown rice.  Lotus Foods also works with small family farmers to preserve rice biodiversity and grow rice more sustainably worldwide.  What a stellar company!  The ramen only take 4 minutes to prepare and offer various combinations of ingredients.  The ones I use here are brown rice and millet.

Running out with the babes to enjoy this beautiful fall day and warmth while it lasts….

SIGNOFF-A


P.S.

An interview I did back in May is now out in Dote Magazine in Calgary! I couldn’t be more excited to have one of my recipes and an interview on Holistic Health for a Winter Glow [Skin Health] in print!  The team that worked on this article is so inspiring and I am so honoured to be alongside these ladies among the pages of Dote.  If your in Calgary, you can pick up a copy at various locations around the city.  If not, you will be able to read the article on their website in the near future.  


Asian gluten free rice ramen with garlicky greens kale swiss chard broccoli aramame seaweed


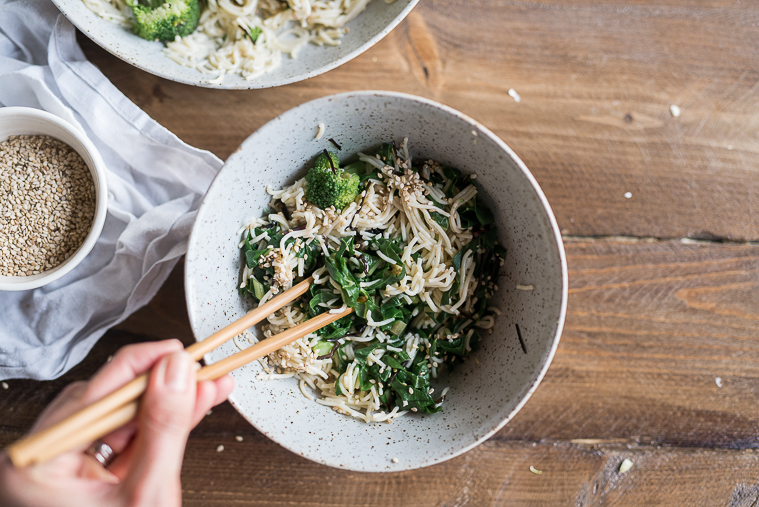
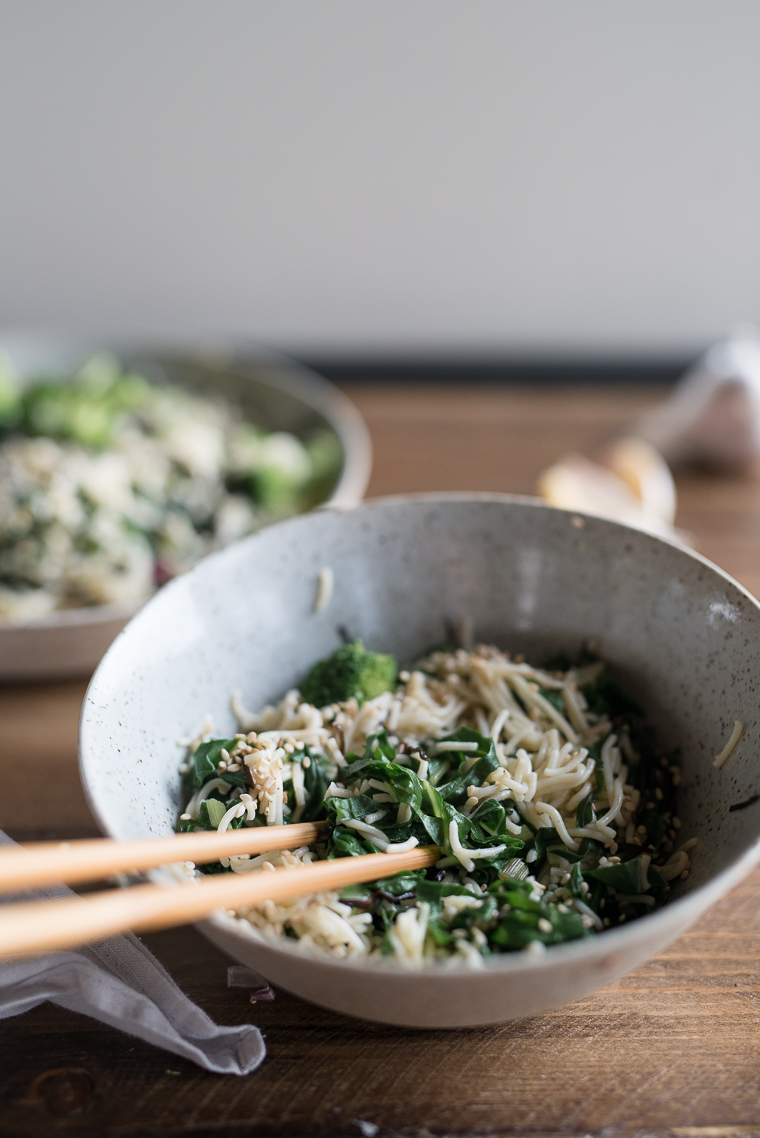
Garlicky Greens and Arame with Brown Rice Ramen: Sesame, Soy, Chili

Serves 2


4 teaspoons sesame oil

4 teaspoons tamari or soy sauce

2 teaspoons water

2 Tablespoons rice vinegar

pinch of dried red chili flakes

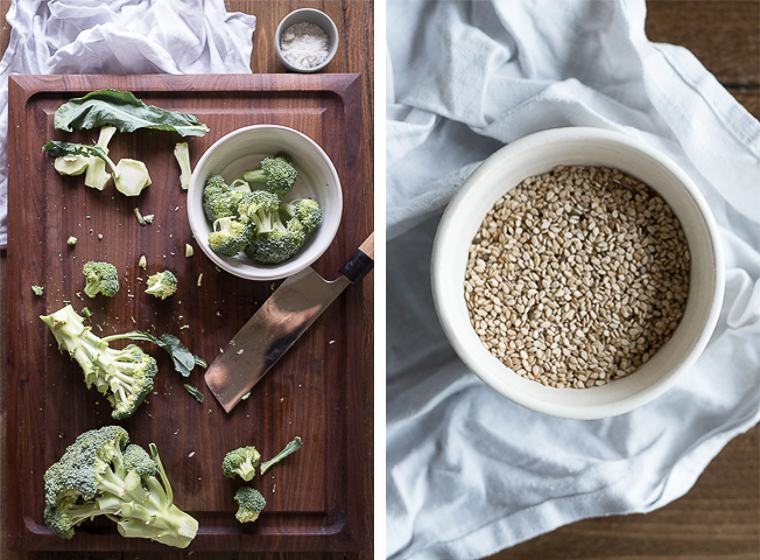
2 Tablespoons aramame seaweed

2 packets of brown rice ramen

1 1/2 cups fresh broccoli florets

1 large garlic clove or 2 small cloves, minced

1 Tablespoon of coconut oil

1 large bunch of fresh greens (In this recipe, I like swiss chard, kale, collards, or bok choy), ribs removed of kale and collards, leaves chiffonade or chopped

Sesame seeds to garnish


  1. In a jar with a tight-fitting lid, combine sesame oil, tamari, water, rice vinegar, and red chilli flakes.  Shake to combine and set aside.  
  2. Place dried arame seaweed in a bowl of pure, fresh water to cover.  Let it sit for 10 minutes.  Drain water and place arame in a large bowl.  
  3. Cook the rice ramen according to the package instructions, drain, and place in the bowl with the arame.  [I like to cook my ramen a tad longer than the instructions]
  4. In the same saucepan that you used for the rice ramen, add the broccoli florets and enough water to cover the broccoli by half.  Sprinkle with salt, cover, and steam over medium-high heat for 4 minutes or until broccoli has softened to your liking. [I like mine with a bit of a crunch left]  Drain and add to the noodles.  
  5. In an iron skillet or fry pan, add coconut oil and garlic and heat over low heat until fragrant, about 30-45 seconds. Add the chopped greens and toss to combine.  Saute over medium-low heat for 1 minute or until greens have wilted.  Remove from the heat and add the garlic and greens to the noodles.  
  6. Toss the noodles and vegetables together with the reserved dressing and top with sesame seeds.  


Back to Top|Email|SHARE ON FACEBOOK|SHARE ON TWITTER

Summer Farmers Market Panzanella Tomatoes Zucchini Green Beans Garlic Herb Breadcrumbs Pangritata

The wine was flowing as the sun dipped into the ocean.  Laughter was heard far from our picnic area as I danced barefoot with dear friends.  Friends that hadn’t been together in years but whose friendship was as strong as the moon’s pull, gathered for a festive dinner on the beach.  A couple weeks ago, these were the nights of our summer.

My summer memories from Alabama always include local bands playing music on the waterfront while we danced with warm beers in our hands.  Those days, eating anything other than crawfish were rare and spending any time in the kitchen just took away from beach and boat time.  Our recent trip to California brought back these carefree summer-time memories and I carried that same easy-breezy mentality when I returned home to the kitchen. The days of summer always make me yearn for impromptu backyard BBQ’s with friends and dishes you can throw together quickly.

summer garden vegetables zucchini tomatoes


Summer Farmers Market Panzanella Tomatoes Zucchini Green Beans Pangritata Bread Crumbs

summer garden vegetables green beans


Summer Farmers Market Panzanella Salad with Tomatoes Zucchini Green Beans Bread crumbs pangritata

As the sun is gradually starting to set earlier here at home, it is a grim reminder that summer is slowly coming to an end. And I realized: I haven’t shared one of my summer recipes!  Summer begs for simple dishes: playing up the flavors of seasonal produce with a pinch of salt, fresh herbs and a simple oil and vinegar mixture. The crisp, fresh taste of summer doesn’t need much to highlight its most complex flavors, which is exactly what I’ve done here. The mere act of salting tomatoes and letting them marinate in their own juice transforms these brightly coloured fruits into a flavour explosion in your mouth!  Add some crunchy “pangritata” (a seasoned bread crumb and walnut mixture from Jamie Oliver), crisp green beans and some sweet, cooling zucchini, and you have one of the easiest summer salads that will impress any guest! 

summer farmers market panzanella salad with tomatoes zucchini green beans bread crumbs pangritata

summers farmers market panzanella salad tomatoes zucchini green beans bread crumbs pangritata

Over the past few months we have been enjoying vegetables and whole foods in their purest, most simple form to ensure we get the most out of our farmers market finds as well as our summer nights.  Some of my favourites include blistered snap peas and broccolini with a sweet tahini sauce, sprouted mung beans and lentils with sweet roasted carrots and a cilantro yogurt sauce, harissa-spiced noodles with garlic greens and arame, and sliced zucchini and yellow summer squash with mint and macadamia nuts. (By the way, I have wanted to share all of these with you but haven’t had the time to photograph! Hopefully soon!).  

To give you a bit more inspiration for the last days of summer, here are some of our family’s favourites:


I hope you have found some inspiration to lengthen your summer evenings with this easy and quick salad.  Invite over some friends, throw some food on the grill, turn up the music, and keep the wine flowing. 


SIGNOFF-A


Summer Farmers Market Panzanella
Write a review
Print
Salad
  1. 3 large heirloom tomatoes, sliced thick, 1 slice reserved
  2. 1 zucchini, sliced thinly on a box grater or mandolin
  3. 6 oz green beans
  4. 2 large pinches of salt
  5. handful of fresh basil
Dressing
  1. 1 1/2 Tablespoons lemon juice
  2. 1 1/2 Tablespoons extra virgin olive oil
  3. 1/2 Tablespoon apple cider vinegar
  4. 1 teaspoon dijon mustard
  5. salt and pepper to taste
Pangritata
  1. 1 large piece of stale whole grain bread, or toasted bread
  2. 1/4 cup walnuts
  3. 1/2 a large garlic clove or 1 small
  4. leaves from 2 thyme sprigs
  5. 2 pinches of salt
  6. pepper
  7. 1 Tablespoon coconut oil
Instructions
  1. Lay the tomatoes in a single layer on a large serving platter or in a large bowl. Sprinkle generously with salt. Depending on the size of your bowl, you may need to make two layers of tomatoes after sprinkling the first layer with salt.
  2. In a large pot of boiling, salted water, blanch the green beans for 4-5 minutes or until they are cooked but still crunchy. Drain, run under cold water, then set aside.
  3. In a jar with a tight-fitting lid, combine all dressing ingredients and shake vigorously until combined. Squeeze the piece of tomato you reserved into the dressing and shake together again. Set aside the dressing.
  4. If you don't have stale bread, place the fresh bread in the oven at 350 F until hard. Remove and transfer to a food processor with the walnuts, garlic, thyme, salt, and pepper. Pulse until well combined and the consistency of bread crumbs.
  5. Heat a skillet over medium high heat and add 1 tablespoon of coconut oil. Add the pangritata and toast the bread crumb mixture for 1-2 minutes, stirring frequently. Be careful not to burn, you just want to toast until fragrant. Transfer to a jar with a tight-fitting lid. You can keep the pangritata for 5 days.
Arrange the salad
  1. Roll the basil leaves and thinly slice (chiffonade). Sprinkle the basil over the tomatoes and add the zucchini slices and green beans. Toss with a bit of dressing (dress with half, taste, then add more depending on your liking and the amount of tomatoes and zucchini you had). Top with the pangritata. Enjoy!
Notes
  1. Pangritata recipe adapted from Jamie Oliver
Love & Garnish — A Nourishing Kitchen https://loveandgarnish.com/
  • Brooke @ Chocolate + Marrow - I’m not sure which I love more, your words or your photos or this dish! They’re all just perfect. Slow summer BBQs with friends are definitely the highlight of the season for me too. I’m actually having a dinner party tonight and was looking for a way to dress up a caprese salad (with our homegrown heirloom tomatoes!!!)…do you think this pangritata would go well??ReplyCancel

    • Love & Garnish - Sorry for the late reply! You know I’ve had issues with my comments but it looks like they are fixed now. I saw you put the pangritata on a caprese…yum!! I miss summer BBQ’s already…time for Thanksgiving!ReplyCancel

  • Emily - this sounds like the perfect summer dish! about how many does this serve? (ReplyCancel

    • Love & Garnish - Hi Emily! Sorry for the late reply I have had some issues with my comments! This should serve 4 as a side dish 🙂ReplyCancel

Back to Top|Email|SHARE ON FACEBOOK|SHARE ON TWITTER

Lemon Coconut Squares with Rose-Water Stewed Rhubarb

I haven’t visited this space in a while…a space that now feels like a distant friend whom I loved catching up with for a weekly coffee.  A friend that meant so much to me and was so much a part of me.  Then life got too busy, diapers piled up, things became stressfully dark at times, and the coffee dates quickly dwindled to a sweet memory.  It isn’t because I didn’t want to be here.  I did; more than anything.  Before Knox was born, this blog was my identity.  A proud badge of honour I wore and enjoyed sharing with people.  I couldn’t wait to send my readers the next newsletter, excitedly telling them of my newest kitchen creation. 

I wasn’t sure if I was going to go into the reason why I have been away for so long.  However, as a new mother with so many friends becoming new mothers this year and hopefully the next, I feel it’s important I do so.  About 2 months ago I had a very scary meeting with Post Partum Depression.  Things got real, real quick.  It became quite clear I had taken on too much, thinking I could easily be super woman/mom: keeping up with my blog, taking on even more projects for “Love and Garnish”, entertaining visitors every day for a month, cooking, laundry, exercising, and of course, taking care of Knox.  What has taken me almost Knox’s entire life to realize is that all of those goals for a new mother is absolutely absurd.  After 2 months of trying to juggle all of those things, I fell into a dark, lonely place of anxiety and depression, with day-long crying fits I couldn’t control and nightmares that turned into days of anxiety attacks.  I got to the point where I couldn’t even be alone at night, following my husband around the house, forcing him to come to bed at the same time as me so I could hold his hand while I anxiously drifted off into a scary sleep.  

It wasn’t until I reached out to a friend, my midwife, that I got the help I needed.  I was too ashamed to tell anyone else the whole story, even my husband.  “What would people think of me?! How would it make me look as a mother if people knew the things going through my head?!”  Thank god I spoke up and confided in a friend because I soon found out those are common themes in the mind of a mother suffering from PPD.  After I got the help I needed, I was quickly on my way back to my old self.  There is nothing more scary than not having control over your mind and emotions.  But what I learned was this was not my fault; it was those crazy post-natal hormones! Those things are no joke, I tell you! After I sought help, I put together a wellness plan for myself: twice a week I would go to yoga and Dane would watch Knox, I would ask for help even when I think I didn’t need it, I would allow Dane’s mom to come babysit more often so I could take naps, I would put everything on the back burner for a while so I could concentrate on being a mom, and I would employ a powerhouse of professionals to get me through this (my naturopath, my Dr., a counsellor, a psychiatrist, and my holistic nutrition knowledge).  Everyone’s story ends differently but I am proud to say I was able to do this without conventional medication.  Don’t get me wrong, I wasn’t sure if I could do it, so I had the anti-depression prescriptions filled  and tucked away in my drawer should I have another “dark spell”.  I consider myself lucky that I was able to do this naturally and haven’t needed them yet.  Not everyone can do that and shouldn’t try to do it if its not right for them.  Bottom line is that Knox is safe, so if my husband or I ever thought he was or could be in danger, I agreed to go on the medication.  That day hasn’t come and I’m so very happy.  

So today, I am sharing with you a recipe I shared with Pure Green Magazine a few weeks ago.  Pure Green Magazine is taking submissions from readers on seasonal recipes to be included in a cookbook and this was one I submitted for Spring.

lemon coconut squares with rose stewed rhubarb dairy free gluten free vegan

Lemon Coconut Squares with Rose-water stewed rhubarb

DSC_6951

In lu of my new mantra “It doesn’t matter what you do, just do it well”, I vow not to put too much pressure on myself to come back to this space on a weekly basis…maybe not even on a bi-monthly basis, but whenever my fingers miss the keys and whenever my sweet Knox and mental health allow me the time to photograph and write, I will be back.   So when you read a post from me, whenever that may be, know that I worked hard on it.  I took a bit of time out of each of my well-energized days to put together the blog post you are reading right now.  I savoured every moment in this space because I wasn’t sure when it would come around again.  It doesn’t matter that I’m not posting every week, only the quality of my work when I do post.  So here it is: a quality recipe that has been so damn popular in my house over the past couple of months and a dish that got gobbled up as soon as it hit the table at every event I brought it to.  I hope you enjoy 🙂 

lemon coconut squares with rose water stewed rhubarb dairy free gluten free vegan

I would like to add that if you are going through PPD or think you are experiencing symptoms, go talk to someone immediately.  You are never alone and there are so many women out there going through the same thing, we just have to speak up and get the help we need and our children deserve.  Everyone deserves to be happy and healthy but how we get there is our own journey.

xoxo

SIGNOFF-A


Lemon Coconut Squares with Rose-Water Stewed Rhubarb
Write a review
Print
Rose-stewed rhubarb
  1. 1 1/2 cups cubed rhubarb
  2. 1/4 cup rose water
  3. 1/3 cup honey
  4. 1, 2-inch piece of vanilla bean
Lemon Coconut Cream
  1. 1 1/2 cups cashews, soaked in pure water overnight
  2. 8 Tablespoons fresh lemon juice
  3. 1 cup coconut cream*
  4. 1/2 teaspoon vanilla powder or vanilla bean seeds
  5. 1 1/2 teaspoons lemon zest
  6. 3 Tablespoons honey
  7. 1/4 cup melted coconut butter (make sure this is liquid when added to the blender)
  8. Pinch of salt
Crust
  1. 1 1/2 cups walnuts
  2. 1/2 cup date paste
  3. 1/4 cup shredded unsweetened coconut
  4. Dried rose petals, optional garnish
  5. Extra shredded coconut, optional garnish
Instructions
  1. In a food processor, combine walnuts, date paste and coconut. Pulse until well combined. Line a 9” x 7” pan with parchment paper. Spread the date-walnut mixture on the bottom and press down firmly to make a flat layer that lines the entire bottom of the pan. Transfer to the fridge.
  2. Prepare the rhubarb: Cut the vanilla bean lengthways and scrape the vanilla bean seeds out. Transfer the vanilla bean and seeds to a small saucepan and add rhubarb, rose water, and honey. Bring to a boil, lower the heat to medium-low and simmer uncovered for 8 minutes. Pour the rhubarb over the date-walnut mixture and spread evenly to create a second layer. Transfer back to the fridge for at least an hour.
  3. Prepare the lemon coconut cream: Drain the cashews and rinse thoroughly in clean water. Add the cashews to a high-powered blender along with the lemon juice, coconut cream, vanilla powder, lemon zest, honey, liquefied coconut butter, and salt. Blend on high until well combined. Pour over the rhubarb and transfer back to the fridge for a minimum of 2 hours.
  4. Slide the parchment paper with the contents onto a cutting board. Cut into squares and enjoy!
Notes
  1. To save time, I made the rose-water stewed rhubarb the night before and allowed it to cool in the fridge overnight while the cashews soaked. In the morning, I was able to put this together quite quickly because the rhubarb had already chilled.
Love & Garnish — A Nourishing Kitchen https://loveandgarnish.com/
  • Brooke @ Chocolate + Marrow - Anise this is such a lovely post for so many reasons. Thank you for being so vulnerable and sharing your experiences with your readers. It matters. I can’t say I understand PPD, seeing as how I have no children, but I have struggled with periods of depression for various reasons and your words and experiences have definitely resonated with me.

    This post is beautiful from the inside out and your hard work, dedication, and passion for this space pour through every line and every photo. I can’t wait for your next post, whenever it may be. As you say, “It doesn’t matter that I’m not posting every week, only the quality of my work when I do post.” Cheers to that, talented lady!ReplyCancel

  • Cheryl - So proud of you for sharing, Anise. You are an amazing lady and an amazing Mom. And that dish looks unbelievably spectacular!
    Xo A. CherylReplyCancel

  • Tisha - I’m glad you’re doing well! It sounds like you have so much on your plate, and it was so brave of you to reach out. This recipe looks amazing 🙂

    TishaReplyCancel

  • Jake - Looks delicious Anise!ReplyCancel

Back to Top|Email|SHARE ON FACEBOOK|SHARE ON TWITTER

kale caesar dairy free

 “Is this for real?!?! Is this really happeneing?!”.  As my eyes blinked in shock, I realized I was looking at some of my best friends from back home! There, in my living room, stood 3 of my favorite girlfriends, in the flesh! They had flown in to surprise me for Knox’s baby shower (my husband is a great secret keeper!).  Thats the thing about my group of friends from back home: we always make an effort, no matter how difficult it is or how far we are.   And it meant the world to me that they made it all the way to Canada to meet baby Knox.  

As I entered the hectic house after a morning at the hair salon, friends from all over were hustling and bustling getting the house ready for Knox’s shower.  Two of my best friends were hosting and had thought of every detail, from the cupcake toppers, photo banners, “Wishes for Baby” cards, beautiful flower arrangements and even an outdoors themed healthy carrot and zucchini cake!  My friend even made personalized accents like the “Knox the Brave” frame below.  It was so touching that everyone had put so much effort into the occasion!
View More: http://looktwicebykelli.pass.us/anise-maternity

collage-2

View More: http://looktwicebykelli.pass.us/anise-maternityView More: http://looktwicebykelli.pass.us/anise-maternityView More: http://looktwicebykelli.pass.us/anise-maternityView More: http://looktwicebykelli.pass.us/anise-maternityView More: http://looktwicebykelli.pass.us/anise-maternity

*BABY SHOWER PHOTOS BY LOOKTWICE PHOTOGRAPHY

I didn’t want a traditional baby shower before Knox was born, but a fun afternoon where everyone could meet baby Knox and have a few cocktails.  For the occasion, I made a healthy version of a kale caesar salad.  I know, I know… this has been done many times before.  Kale salads and Kale caesars have been overdone lately it seems, however, there is something addicting about this one! Even my friend from Alabama texted me when she got home and said “I’m craving that kale salad!! What’s the recipe?! Can you believe I’m saying that?!”.  Well yes, yes I can! I’ve made it three times in the past two weeks, so I totally get it! It’s bad enough that the garlic chickpea “croutons” get eaten before they even make it onto the salad, but the dressing is light, refreshing and surprisingly reminiscent of the original due to the umami flavour of the miso.  

garlic chickpea croutons

kale caesar with garlic chickpea croutons - vegan dressing

kale caesar dairy free chickpea croutons


I’ll go ahead and say “your welcome” now because this will be one for the books.  😉

Thank you for all the love at Knox’s shower and the details you all put into it.  I still can’t believe you ladies flew all the way to Canada to surprise me and to make it an extra special occasion!


SIGNOFF-A


Kale Caesar with Garlicky Chickpea Croutons
Write a review
Print
CHICKPEAS
  1. 1, 16 oz can of chickpeas
  2. 1 Tablespoon coconut oil
  3. 1/2 teaspoon sea salt
  4. 1/2 teaspoon garlic powder
  5. generous amount of fresh cracked pepper
SALAD
  1. 2 bunches of kale, washed, stems removed and roughly chopped
  2. 1/2 teaspoon of sea salt
  3. 1 small head of radicchio, shredded on a mandolin or box grater
  4. parmesan cheese, sliced on a box grater, for garnish
DRESSING
  1. 3 large cloves of garlic
  2. juice from 1 lemon (approximately 1/4 cup)
  3. 1/2 cup fresh parsley, tightly packed
  4. 1 1/2 Tablespoons dark miso
  5. 1 teaspoon Dijon mustard
  6. 1/2 teaspoon Worcestershire
  7. 1/4 cup olive oil
Instructions
  1. Preheat oven to 400.
  2. Drain chickpeas and lay on a large baking sheet so they are in a single layer. Pat dry. Add the coconut oil and place the baking sheet in the oven to melt the coconut oil, about 1 minute. Remove from the oven and stir together the coconut oil and chickpeas and add the salt, garlic powder and freshly cracked pepper. Bake in the oven at 400 F for 10 minutes, stir, then bake for another 10 minutes. Remove and set aside.
While the chickpeas cook, prepare the dressing
  1. In a food processor, combine the garlic, lemon juice, parsley, miso, dijon mustard and Worcestershire. Blend until well combined. While the food processor is running, add the olive oil slowly. Store the dressing in a mason jar or an air-tight container; will keep for a week. Set aside.
Prepare the salad
  1. In a large bowl, combine chopped kale and the 1/2 teaspoon of sea salt and "massage"* the kale until it is wilted and soft. Add the radicchio, chickpeas, and half the dressing. Toss to combine; add more dressing if you like. Garnish with parmesan cheese
Notes
  1. *To "massage" the kale, basically "scrunch" the kale with the salt between your hands
Love & Garnish — A Nourishing Kitchen https://loveandgarnish.com/
  • admin - Yummy!! Looks so good.

    Beautiful food, beautiful baby!! ; _ReplyCancel

Back to Top|Email|SHARE ON FACEBOOK|SHARE ON TWITTER

golden beet blood orange and lentil salad with orange gremolata dressing

The day has finally wound down and its 10:30 pm.  I’m sitting in bed, watching Knox’s little chest move up and down as he snores lightly in his sleep.  I have been meaning to sit down and write my next post for weeks now and I’m thankful for a 30 minute nap today that has given me this tiny burst of evening energy. 

Time moves a bit differently these days. Not so much “slow” because the days seem to fly by, but slow as in we take things a tad slower.  The little things are appreciated a bit more like Knox’s little gurgles or a 20 minute run outside I got to take with Harvey, our energetic goldendoodle.   If I can feed myself and Knox, take a shower and get a few things done around the house I feel accomplished.  I don’t have daily “To Do” lists but weekly ones now….and that’s ok because Knox deserves all my attention at the moment. 

“Just a splash of vinegar, now add a bit of oil…but can you stand to the side so I can see how much you pour in?!”.  This is how cooking has been going lately.  I begin the process then most of the time I can’t finish because Knox needs me, so I have to dictate to my husband how to finish making our dinner! Its actually quite entertaining and I bet if anyone were to peak inside our window between 630 and 7 pm they would get a good laugh. 

golden beet blood orange and lentil salad with orange gremolata dressing

*DSC_6289-H

golden beet blood orange and lentil salad with orange gremolata dressing

CAN’T “BEET” IT

I love beets, especially golden beets: the sweet yet earthy flavour that is only apparent in these little golden beauties.  This is the perfect post-partum recipe because not only am I getting iron-rich beets, beet greens and lentils, but the vitamin-C-packed blood oranges aid in the absorption of iron!  Lentils also pack a protein punch and the oil in the gremolata is the perfect amount of healthy fat to keep you full longer.  This would be a great salad for anyone, but especially beneficial during pregnancy, right after birth, and during breastfeeding.  

Can you blame me for wanting to watch him all day instead of blogging?! Its so funny, but even though he is right beside me, I miss him!  Thank goodness for this quick and easy make-ahead salad to get me through the week!

 calgary baby photography


SIGNOFF-A


Gremolata-Marinated Golden Beet Salad with Blood Oranges and Lentils
Serves 2
Write a review
Print
GROCERY LIST
  1. 2/3 cup black lentils
  2. 3 medium-to-large golden beets, plus beet greens
  3. 1 blood orange, sliced or chopped, skin removed
  4. 1 cup arugula
  5. 1 cup mixed greens (I used baby swiss chard and mache)
  6. 1 Tablespoon coconut oil
  7. 1 Tablespoon Basil, Cilantro OR Mint, chiffonade* (choose whichever one appeals to you!)
GREMOLATA DRESSING
  1. 1/2 clove garlic, minced
  2. 1/2 teaspoon orange zest
  3. 1/2 teaspoon lemon zest
  4. 4 teaspoons fresh minced parsley
  5. 2 Tablespoons fresh squeezed orange juice
  6. 1 Tablespoon apple cider vinegar
  7. 1 Tablespoon extra virgin olive oil, flaxseed oil, or hempseed oil
Prepare the dressing
  1. Combine all dressing ingredients in a bowl and whisk to combine. Set aside. You can also do this in a mason jar and just shake to combine.
Prepare the beets
  1. Remove the beet greens from the beets and wash vigorously until all dirt is gone. Remove the greens from the stems and chop stems and greens, keeping them separate. Set aside.
  2. Scrub the beets until clean and cut off the "stub" end where the greens were attached. In a medium saucepan, add beets and enough water to cover plus 2 inches. Bring to a boil, then cover and lower to a simmer. Cook time will vary depending on the size of your beets. Mine were medium size and took about 30 minutes. You can test them by sliding a knife into a beet; if it goes in easily, they are finished. Remove the beets from the water and let cool. Remove the beet's skin; it should easily slide off with a bit of rubbing. Cut into quarters or slice. Toss with half the dressing and set aside.
While the beets are cooking, prepare the lentils
  1. In a small saucepan, bring 2 cups of pure water to a boil. Add the lentils and simmer on low for 20-25 minutes or until they have reached the desired consistency. Remove from heat and strain. Set aside.
  2. In an iron skillet or fry pan, heat coconut oil over low heat. Add the beet stems and saute for 2 minutes until soft. Add the beet greens and saute for another minute. Add the lentils and toss to combine.
Assemble the salad
  1. Divide the arugula and mixed greens over two plates and add the lentils, beets, and oranges. Drizzle with remaining dressing and sprinkle on the basil, cilantro or mint.
Notes
  1. *Chiffonade is a cutting method where the herbs are rolled or stacked, then cut into thin strips
Love & Garnish — A Nourishing Kitchen https://loveandgarnish.com/
  • tina jeffers - Congratulations on the new arrival! Lovely post and beautiful photos as always. I can’t wait to try it!ReplyCancel

Back to Top|Email|SHARE ON FACEBOOK|SHARE ON TWITTER